APScheduler 使用记录

由四个组件构成 : 触发器 (trigger),作业存储 (job store),执行器 (executor),调度器 (scheduler)

scripts

触发器 (trigger)

包含调度逻辑,每一个作业有它自己的触发器,用于决定接下来哪一个作业会运行。除了他们自己初始配置意外,触发器完全是无状态的
APScheduler 有三种内建的 trigger:

date: 特定的时间点触发
interval: 固定时间间隔触发
cron: 在特定时间周期性地触发

作业存储 (job store)

存储被调度的作业,默认的作业存储是简单地把作业保存在内存中,其他的作业存储是将作业保存在数据库中。一个作业的数据讲在保存在持久化作业存储时被序列化,并在加载时被反序列化。调度器不能分享同一个作业存储。
APScheduler 默认使用 MemoryJobStore,可以修改使用 DB 存储方案

执行器 (executor)

处理作业的运行,他们通常通过在作业中提交制定的可调用对象到一个线程或者进城池来进行。当作业完成时,执行器将会通知调度器。
常用的 executor 有两种:

ProcessPoolExecutor

ThreadPoolExecutor

调度器 (scheduler)

通常在应用中只有一个调度器,应用的开发者通常不会直接处理作业存储、调度器和触发器,相反,调度器提供了处理这些的合适的接口。配置作业存储和执行器可以在调度器中完成,例如添加、修改和移除作业。

配置调度器

APScheduler 提供了许多不同的方式来配置调度器,你可以使用一个配置字典或者作为参数关键字的方式传入。你也可以先创建调度器,再配置和添加作业,这样你可以在不同的环境中得到更大的灵活性。

1
2
3
4
5
6
7
8
9
from apscheduler.schedulers.blocking import BlockingScheduler
from datetime import datetime

def job():
print(datetime.now().strftime("%Y-%m-%d %H:%M:%S"))
# 定义BlockingScheduler
sched = BlockingScheduler()
sched.add_job(job, 'interval', seconds=5)
sched.start()

上述代码创建了一个 BlockingScheduler,并使用默认内存存储和默认执行器。(默认选项分别是 MemoryJobStore 和 ThreadPoolExecutor,其中线程池的最大线程数为 10)。配置完成后使用 start() 方法来启动。

显式设置 job store(使用 mongo 存储) 和 executor :

1
2
3
4
5
6
7
8
9
10
11
12
13
14
15
16
17
18
19
20
21
22
23
24
25
26
27
28
29
from datetime import datetime
from pymongo import MongoClient
from apscheduler.schedulers.blocking import BlockingScheduler
from apscheduler.jobstores.memory import MemoryJobStore
from apscheduler.jobstores.mongodb import MongoDBJobStore
from apscheduler.executors.pool import ThreadPoolExecutor, ProcessPoolExecutor
# MongoDB 参数
host = '127.0.0.1'
port = 27017
client = MongoClient(host, port)
# 输出时间
def job():
print(datetime.now().strftime("%Y-%m-%d %H:%M:%S"))
# 存储方式
jobstores = {
'mongo': MongoDBJobStore(collection='job', database='test', client=client),
'default': MemoryJobStore()
}
executors = {
'default': ThreadPoolExecutor(10),
'processpool': ProcessPoolExecutor(3)
}
job_defaults = {
'coalesce': False,
'max_instances': 3
}
scheduler = BlockingScheduler(jobstores=jobstores, executors=executors, job_defaults=job_defaults)
scheduler.add_job(job, 'interval', seconds=5, jobstore='mongo')
scheduler.start()

操作 Job

添加

  • add_job()
  • scheduled_job()

第二种方法只适用于应用运行期间不会改变的 job,而第一种方法返回一个 apscheduler.job.Job 的实例,可以用来改变或者移除 job。

1
2
3
4
5
6
7
8
from apscheduler.schedulers.blocking import BlockingScheduler
sched = BlockingScheduler()
# 装饰器
@sched.scheduled_job('interval', id='my_job_id', seconds=5)
def job_function():
print("Hello World")
# 开始
sched.start()

移除 job

  • remove_job()
  • job.remove()

remove_job 使用 jobID 移除

job.remove() 使用 add_job() 返回的实例

1
2
3
4
5
job = scheduler.add_job(myfunc, 'interval', minutes=2)
job.remove()
# id
scheduler.add_job(myfunc, 'interval', minutes=2, id='my_job_id')
scheduler.remove_job('my_job_id')

暂停和恢复 job

暂停一个 job:

1
2
apscheduler.job.Job.pause()
apscheduler.schedulers.base.BaseScheduler.pause_job()

恢复 job:

1
2
apscheduler.job.Job.resume()
apscheduler.schedulers.base.BaseScheduler.resume_job()

apscheduler.job.Job 是 add_job() 返回的实例

获取 job 列表

获得可调度 job 列表,可以使用 get_jobs() 来完成,它会返回所有的 job 实例。

也可以使用 print_jobs() 来输出所有格式化的 job 列表。

修改 job

除了 jobID 之外 job 的所有属性都可以修改,使用 apscheduler.job.Job.modify() 或者 modify_job() 修改一个 job 的属性

1
2
job.modify(max_instances=6, name='Alternate name')
modify_job('my_job_id', trigger='cron', minute='*/5')

关闭 job

默认情况下调度器会等待所有的 job 完成后,关闭所有的调度器和作业存储。将 wait 选项设置为 False 可以立即关闭。

1
2
scheduler.shutdown()
scheduler.shutdown(wait=False)

scheduler 事件

scheduler 可以添加事件监听器,并在特殊的时间触发。

1
2
3
4
5
6
7
def my_listener(event):
if event.exception:
print('The job crashed :(')
else:
print('The job worked :)')
# 添加监听器
scheduler.add_listener(my_listener, EVENT_JOB_EXECUTED | EVENT_JOB_ERROR)

trigger 规则

date

最基本的一种调度,作业只会执行一次

  • run_date (datetime|str) – the date/time to run the job at
  • timezone (datetime.tzinfo|str) – time zone for run_date if it doesn’t have one already
1
2
3
4
5
6
7
8
9
10
11
12
from datetime import date
from apscheduler.schedulers.blocking import BlockingScheduler
sched = BlockingScheduler()
def my_job(text):
print(text)
# The job will be executed on November 6th, 2009
sched.add_job(my_job, 'date', run_date=date(2009, 11, 6), args=['text'])
sched.add_job(my_job, 'date', run_date=datetime(2009, 11, 6, 16, 30, 5), args=['text'])
sched.add_job(my_job, 'date', run_date='2009-11-06 16:30:05', args=['text'])
# The 'date' trigger and datetime.now() as run_date are implicit
sched.add_job(my_job, args=['text'])
sched.start()

cron

  • year (int|str) – 4-digit year
  • month (int|str) – month (1-12)
  • day (int|str) – day of the (1-31)
  • week (int|str) – ISO week (1-53)
  • day_of_week (int|str) – number or name of weekday (0-6 or mon,tue,wed,thu,fri,sat,sun)
  • hour (int|str) – hour (0-23)
  • minute (int|str) – minute (0-59)
  • second (int|str) – second (0-59)
  • start_date (datetime|str) – earliest possible date/time to trigger on (inclusive)
  • end_date (datetime|str) – latest possible date/time to trigger on (inclusive)
  • timezone (datetime.tzinfo|str) – time zone to use for the date/time calculations (defaults to scheduler timezone)
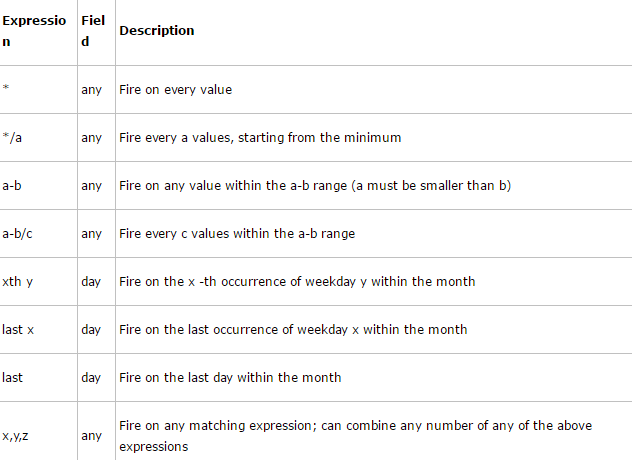
表达式:
python_timer_expression.png

1
2
3
4
5
6
7
8
9
10
11
12
from apscheduler.schedulers.blocking import BlockingScheduler

def job_function():
print("Hello World")
# BlockingScheduler
sched = BlockingScheduler()
# Schedules job_function to be run on the third Friday
# of June, July, August, November and December at 00:00, 01:00, 02:00 and 03:00
sched.add_job(job_function, 'cron', month='6-8,11-12', day='3rd fri', hour='0-3')
# Runs from Monday to Friday at 5:30 (am) until 2014-05-30 00:00:00
sched.add_job(job_function, 'cron', day_of_week='mon-fri', hour=5, minute=30, end_date='2014-05-30')
sched.start()

interval

参数:

  • weeks (int) – number of weeks to wait
  • days (int) – number of days to wait
  • hours (int) – number of hours to wait
  • minutes (int) – number of minutes to wait
  • seconds (int) – number of seconds to wait
  • start_date (datetime|str) – starting point for the interval calculation
  • end_date (datetime|str) – latest possible date/time to trigger on
  • timezone (datetime.tzinfo|str) – time zone to use for the date/time calculations
1
2
3
4
5
6
7
8
9
10
11
12
from datetime import datetime
from apscheduler.schedulers.blocking import BlockingScheduler

def job_function():
print("Hello World")
# BlockingScheduler
sched = BlockingScheduler()
# Schedule job_function to be called every two hours
sched.add_job(job_function, 'interval', hours=2)
# The same as before, but starts on 2010-10-10 at 9:30 and stops on 2014-06-15 at 11:00
sched.add_job(job_function, 'interval', hours=2, start_date='2010-10-10 09:30:00', end_date='2014-06-15 11:00:00')
sched.start()

传递参数

1
2
sched.add_job(job1, 'interval', seconds=1, args=["a", "b", "c"])
sched.add_job(job2, 'interval', seconds=1, kwargs={"a": "a", "b": "b", "c": "c"})

misfire 和 job 合并

可以通过设置 job 的 misfire_grace_time 选项来指示之后尝试执行的次数

可以合并所有错过时间的 job 到一个 job 来执行,通过设定 job 的 coalesce=True

1
misfire_grace_time=60

flask

flask-apscheduler 官方 git

config

1
2
3
4
5
6
7
8
9
10
11
12
class Config(object):
SCHEDULER_JOBSTORES = {
'default': SQLAlchemyJobStore(url='sqlite://')
}
SCHEDULER_EXECUTORS = {
'default': {'type': 'threadpool', 'max_workers': 20}
}
SCHEDULER_JOB_DEFAULTS = {
'coalesce': False,
'max_instances': 3
}
SCHEDULER_API_ENABLED = True

job 并不推荐 在 Config 中设置

start

1
2
3
4
5
6
7
8
9
app = Flask(__name__)
app.config.from_object(Config())

db.app = app
db.init_app(app)

scheduler = APScheduler()
scheduler.init_app(app)
scheduler.start()

job 操作同 apscheduler

django

官方git

start

1
2
3
4
5
6
7
8
9
10
11
12
13
14
15
16
17
18
19
20
21
22
import random
import time

from apscheduler.schedulers.background import BackgroundScheduler

from django_apscheduler.jobstores import DjangoJobStore, register_events, register_job

scheduler = BackgroundScheduler()
scheduler.add_jobstore(DjangoJobStore(), "default")


@register_job(scheduler, "interval", seconds=5, replace_existing=True)
def test_job():
time.sleep(random.randrange(1, 100, 1)/100.)
print("I'm a test job!")
# raise ValueError("Olala!")


register_events(scheduler)

scheduler.start()
print("Scheduler started!")

Tips

local tiamezone 问题

flask 中使用时,未指定 timezone, 报错 Unable to determine the name of the local timezone

在添加任务时指定 timezone

1
scheduler.add_job(id=job_id, func=update, trigger='interval', seconds=int(interval),misfire_grace_time=30, timezone="UTC")

django 中读取数据库链接失效问题

  • 场景
    在 job 中使用 django.db, job 调用时报 mysql has gone away 错误

  • 原因

    应该是 job 被调用的时使用了 django.db 中已关闭的连接 不知所云 ing

  • 解决方案

    job 中使用 django.db 之前关闭连接

      
    1
    django.db.close_old_connections()

flask 中任务重复运行

  • 场景
    flask 服务开启 debug 模式, tigger = interval 模式下, 修改代码服务自动重载后定时任务会启动两次, 其它模式下为验证
  • 原因

    scheduler.start() 在 debug 模式下被重载创建了新的进程

时区问题

在使用 apscheduler 框架是遇到 Unable to determine the name of the local timezone 错误

修改系统时区

1
2
3
4
rm -rf /etc/localtime
ln -s /usr/share/zoneinfo/Asia/Shanghai /etc/localtime
# centos7
timedatectl set-timezone Asia/Shanghai